Hello guys! This blog is long overdue, so without further ado here are my favorite stuffs for month of June! I honestly have a lot of things to share to you as my favorite, but I cut it down to seven, my favorite number, which is not easy at all. Still, I tried!
DKNY bag from their "Poetic Rebellion" line
I got this gorgeous bag from Marshalls in much cheaper price. I have been carrying it the whole month of june and I super love it! It is spacious, can carry all my musts and most of all I love the summery color. Moreover, my hubby paid for it, nyahaha! Thank you so much langga!
To tame and care for my mane, I am loving this Pantene Heat Protection Spray. Not only does it protect my hair from from using hair dryer and iron, it also leaves my hair soft and frizz-free.You should try this!
I love makeup! And june would have been incomplete without it. For this hot season, BB cream is a must! Not only is it light and gives sheer to medium coverage, but also it has SPF 35 that protects you from harsh rays of the sun. Not only that! It is first and foremost moisturizing! Love, love, love!
Smashbox BB Cream in light medium
Another hit for me is the Milani Baked Powder Blush in Corallina. I am a fan of Milani's baked blush and this color is just perfect. This blush is highly pigmented, finely milled and long lasting. Corallina, as its name says, this color is a beautiful coral with slight shimmer in it. This gives my cheeks a gorgeous glow without me looking like a disco ball, hehe! This for me is a must have for summer!
Milani Baked Blush in Corallina or #08
Urban Decay Lip Junkie in Naked
I am in love with Urban Decay's lip junkie in Naked. This is my favorite among my lip glosses. It gives your lips a shine without the sticky feeling. It is minty too. Very addicting!!! I only have this in sample size that came with their Naked Palette. I am definitely getting the full size of this in all colors (after 2 OTs, nyahahah!).
I was all lippy last june! Here is another fave for my lips. Another must-have is the Lush Lip Scrub in Mint Julips. Love it! My lips have been cracking during the change of season from spring to summer. This lip scrub has been a saving grace for me. This is a minty sugar scrub that keeps my lips perfectly soft at all times. And to complete the lip service, I apply me fave lip balm, the Lush lip balm in Honey Trap. This gives vanilla honey kisses to my hubby, hehe!
So these are my lovely seven! What are yours? I hope you enjoyed my blog!
Lately, I have been a fan of watching make-up tutorials in you tube. One of the Beauty Gurus that I love, love, love so much is Jackie Perdue, also known as JaaackJack in her you tube account. She is the reason why I made my own you tube account, just to follow her videos. I know that sounded creepy, hahaha! But I promise, following her on video and blog is about my own growth and not the stalker kind of way, hehe! She is just amazing!!!! As I was watching her videos, I encountered her Skinny Jeans Smokey Eye tutorial and for so long I have been wanting to try smokey eyes and see how it would look on me. I am not a savvy make-up artist, and no close to being one. I only do powder and lipstick most of the time, but I have tons of make-up at home! And this video just gave me the urge to try my stuff and for once make use of it. My hubby would be ecstatic knowing I am using my make-up, hahaha! He paid most of it, nyahahaha! Spoiled me.
Anyway, here is my version of Jackie's....
First, prep face for a clean canvass. Then, apply a good eye shadow base on your eye lids. For me, I used my Urban Decay Eyeshadow Primer Potion, and applied it all over my upper eye lids up to my brow line and bring some to my lower lids as well. Primer will increase the life of your shadows and make the color more vibrant too.
Then, apply a cream shadow on your upper lids. In Jackie's video she used Benefit Creaseless Cream Eyeshadow in Skinny Jeans, but in mine, I was using Maybelline Color Tattoo by Eyestudio in Audacious Asphalt. I have seen videos saying that the Maybelline one is a dupe for the Benefit's, but I will never know until I have one of the Benefit's, hehe! So, using my Borghese 105 concealer brush, I applied the cream shadow to my upper lids.
And then, with the use of the Urban Decay Naked Eyeshadow Palette, mix Toasted and Hustle colors using a fluffy crease brush (Borghese 200 - eye powder fluffy brush) and blend out the lines of the cream shadow for a gradient and more natural looking. And then take the Naked color from the same palette to blend everything out up to the eyebrows (Same as Jackie's).
Using the same Naked Palette Eyeshadow, darken the corner of your eyes and the eyelids with the color Creep using a tapered crease brush. For me, used my Borghese 201 - eyeshadow brush. Concentrate the said color to the outer V of the eye and then bring down the color as well to your lower lash line.
I am not sure if I have applied mine the right way, it looks different from Jackies', hahaha!
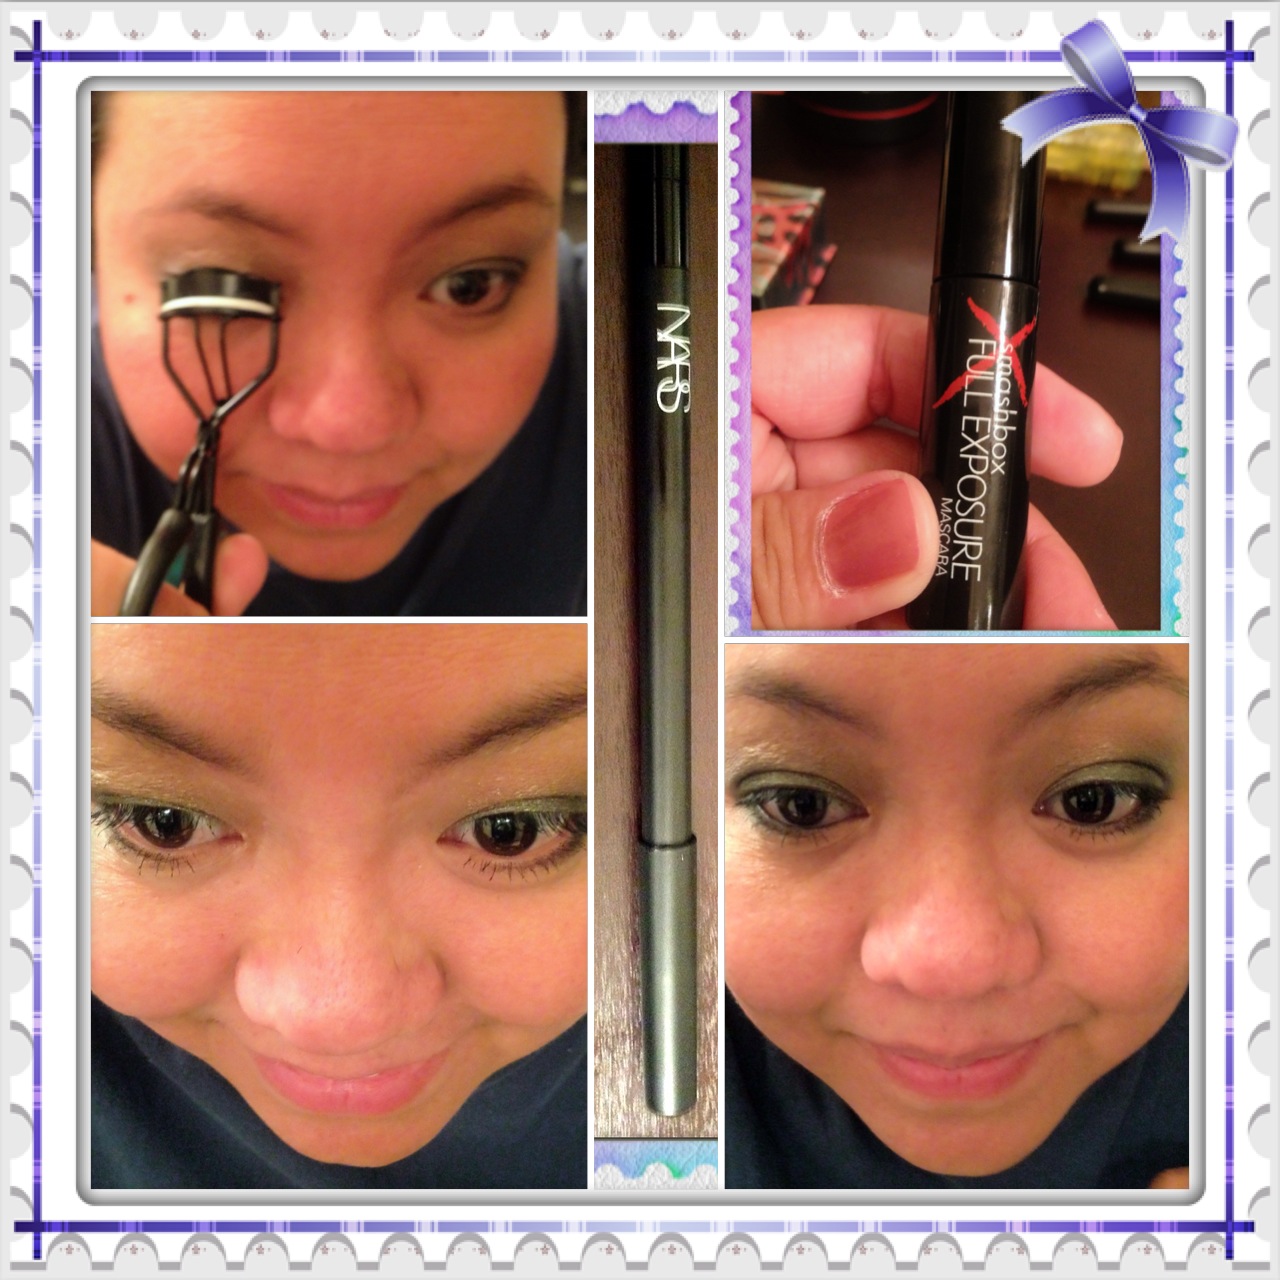
Supposed to be, the next step is to add highlighters on the brow bone area and the inner corner of the eye. I'm sorry, I just don't have any of that. So I proceeded to curling my lashes, putting my Smashbox Full Exposure Mascara on and line my water line with my Nars Larger than Life Long-wear Eyeliner in Via Veneto. Also, Jackie is a pro with winging eyeliners on upper lid, I myself was a disaster. I end up messing my eye make up and redoing everything, hahaha! So, I will skip the cat eye. I need more practice on that. ;)
Another step that I missed is the putting on of fake lashes and filling the eyebrows. I need more practice on that too... Sorry! ( So sorry Jackie for messing up this tutorial.... I am definitely watching your video on eyebrows and fake lashes!)
And since I don't have a highlighter, I instead use my concealer (ELF tone correcting concealer) and dab some of it in my brow bone, in the inner corner of my eyes and on my lower lids as well. Not only will this hide dark under eye circle, it will also brighten the eye area.
See?! It does brighten my eye area! weeeeeee!
After doing all the eye make-up, we will then apply our face make-up. I am a fan of BB creams and so far I am loving and hoarding on Smashbox Camera Ready BB cream in Light/Medium. Instead of foundation, I applied this BB cream all over my face.
My beauty lines are still showing up, hehehe! But at least the redness and big pores on my face is gone! Wohoooo! :)
Moving on, apply powder to set your make-up. I applied my Physician Formula Mineral Airbrushing Pressed Powder using my Sigma F30 large powder brush. Not only does this set your make-up but also mattifies your face. Then, apply your blush on the apples of your cheek. I used my Benefit Coralista, like Jackie's! Weeeee! hehe! I super love Benefit's powder o' box and Coralista is one of my fave.
Next, apply our favorite lipstick. Since we have a strong eye make-up, I would recommend going minimal with the lips. So, I just applied on my Neutrogena Moisture Smooth Color Stick in fresh papaya and applied over it my NYC Liquid lipshine in Nude.
I feel like I have not darkened enough my eyes for a true smokey eye feel... :(
And Woahlaaahhh! My (not-so) Audicious Asphalt Look, hehehe!
Excuse the eye bags, I just worked night shift and no sleep for almost 24 hours, hehe!
As conclusion, I see that I definitely need more practice! hehe! But this is a good start right?! Oh well, I hope you guys enjoyed my adaptation of Jackie's tutorial. I am putting down below Jackie's tutorial in you tube. I hope you will enjoy her channel as much as I did. Till my next blog!